Velleman KNS2 Specifications
Browse online or download Specifications for Toys Velleman KNS2. Velleman KNS2 toy User Manual
- Page / 9
- Table of contents
- BOOKMARKS
Summary of Contents
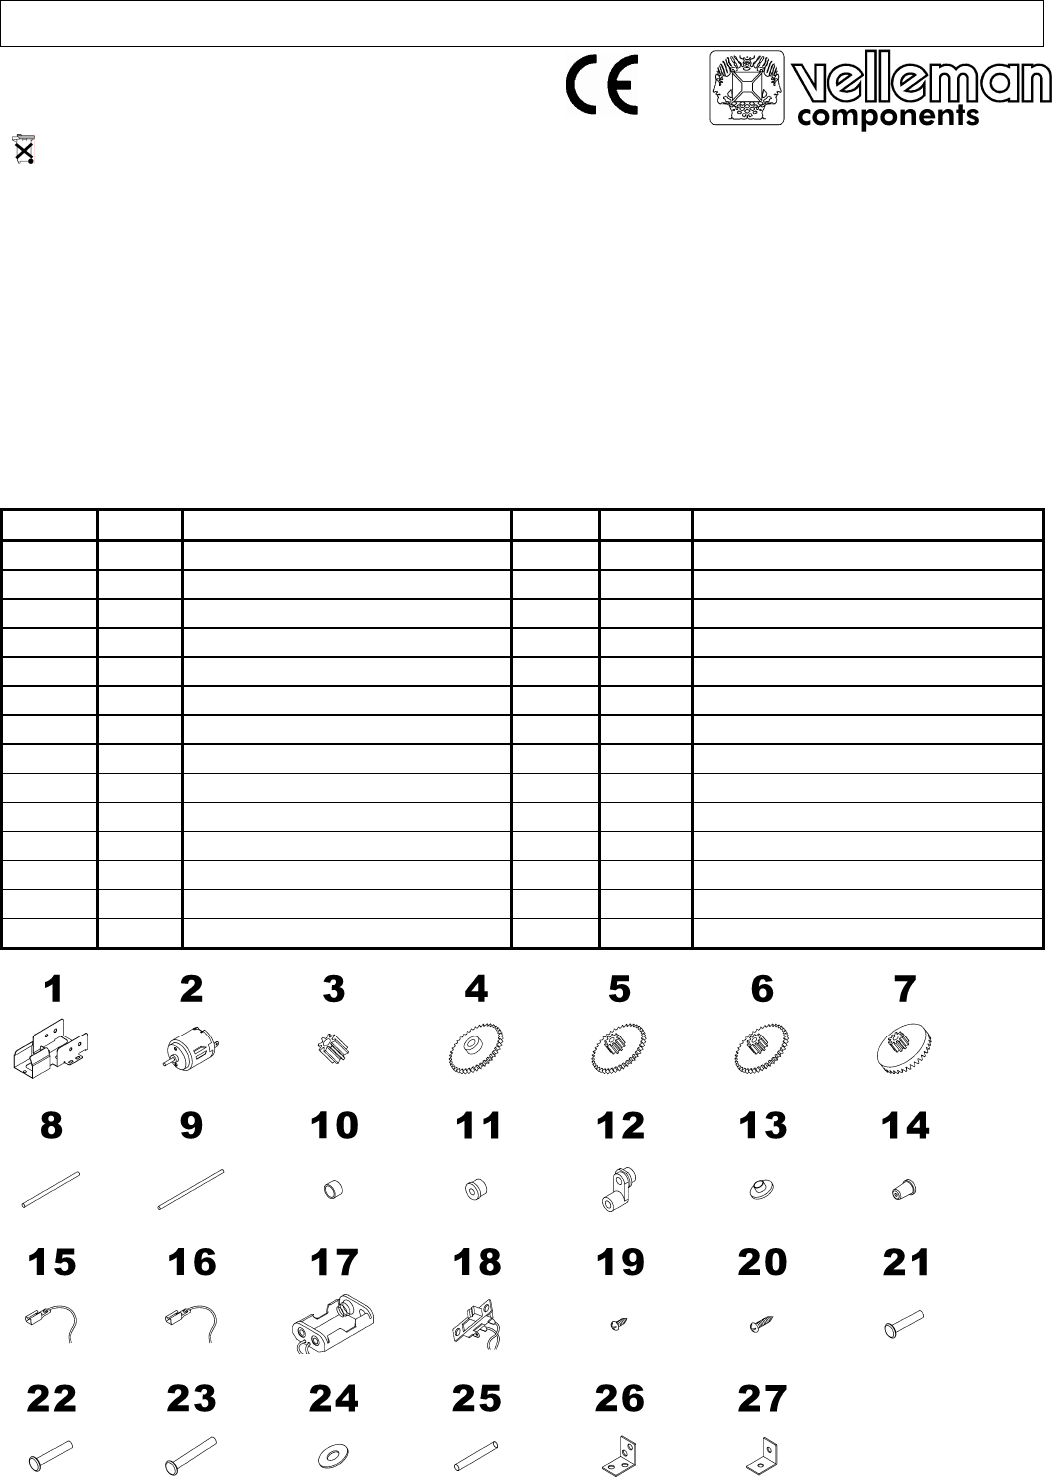
KNS2 – STEGOMECH 1. Introduction & Characteristics Dispose of this product in accordance with Local and national disposal regulations. Thank yo
3. Prepunched Boards Fig.2 4. Assembly The gears (P4-7) should be placed to the left of the pinion gear (P3). Put one N-shaped nylon connector
Fig.5 Mount the left (W30/32/34) and right (W31/33/35) legs to the sides of board W27 as in the figure. Fig.6 Mount boards W36 and W37 to board
Fig.9 Fig.10 Fig. 9-12: Mount the remaining pieces according to the drawings. Fig.11 Fig.12 The specifications and contents of this manua
2. Lijst van onderdelen (zie fig.1 blz.1) Nr. Hoev. Beschrijving Nr. Hoev. Beschrijving 1 1 tandwielkast 15 1 draad met connector (geel) 2 1
KNS2 – STEGOMECH 1. Introduction et Caractéristiques Débarrassez-vous de ce produit en respectant la législation d'élimination locale et nation
Fig. 7: Connectez les panneaux W36 et W37 au fond du panneau W27 au moyen de panneaux de fixation P26 et de vis P19. Vissez le porte-piles (P17) au f
4. Montaje (véase fig.3-12 p.2-4) Fig. 3: Coloque los piñones (P4-7) a la izquierda del satélite (P3). Apunte el primer conector ”N” de nylon (P12) h
2. Stückliste (siehe Abb. 1 Seite 1) Nr. St. Beschreibung Nr. St. Beschreibung 1 1 Getriebe 15 1 Draht mit Anschluss (gelb) 2 1 Motor 3Vdc 1
Related products and manuals for Toys Velleman KNS2

 (4 pages)

 (7 pages)
(8 pages)
(19 pages)
(9 pages)
(7 pages)
(14 pages)
(9 pages)
(7 pages)
(8 pages)
(19 pages)
(9 pages)
(7 pages)
(14 pages)
(9 pages)
 (19 pages)
 (6 pages)
(7 pages)
(14 pages)
(4 pages)
(19 pages)
(20 pages)
(19 pages)
(7 pages)
(4 pages)
(8 pages)
(21 pages)
(6 pages)
(7 pages)
(14 pages)
(4 pages)
(19 pages)
(20 pages)
(19 pages)
(7 pages)
(4 pages)
(8 pages)
(21 pages)
© 2020, manymanuals.com. All rights reserved. | 1.396 s |
 Manymanuals.com
 Manymanuals.de
 Manymanuals.fr
 Manymanuals.it
 Manymanuals.pl
 Manymanuals.cz
 Manymanuals.es
 Manymanuals-pt.com
Comments to this Manuals